GenioWeb Hybrid Installation
Topics
Overview
The Genio backoffice is of utmost importance, especially during the initial phase when GenioWeb is still in its early stages of development. In this initial phase, GenioWeb may have limited functionalities, and to compensate for that, the Genio backoffice plays a crucial role in supporting various project management tasks.
By utilizing the Genio backoffice during this initial phase, users can effectively bridge the gap between the current state of GenioWeb and their project requirements.
The main functionalities for application development are mostly implemented, however for other functionalities, such as special renderings, EPHs or other more advanced ones, it is necessary to use the genio backoffice.
It ensures a smooth project development experience, empowering users to efficiently organize, monitor, and control their projects until GenioWeb matures and encompasses more robust project functionalities.
The installation process can be divided into two distinct parts to ensure a smooth setup experience:
-
The first part involves preparing the environment without the generation service. This step focuses on configuring the necessary infrastructure, such as setting up the required hardware and software components. It includes tasks such as installing the operating system, setting up the database, configuring network settings, and preparing any additional prerequisites. During this phase, the Genio backoffice serves as a valuable support tool, providing guidance and assistance throughout the environment setup.
-
Once the environment is properly prepared, the second part of the installation process involves enabling the generation service. This step is specifically dedicated to configuring and activating the Genio generation service, which is responsible for generating code, scripts, and other artifacts based on the defined models and rules. This phase includes configuring the generation service settings, connecting it to the database, and ensuring that all necessary dependencies are in place. The Genio backoffice continues to be a valuable resource during this stage, providing support and assisting in the activation and configuration of the generation service.
By dividing the installation process into these two parts, users can focus on each aspect separately, ensuring a systematic and efficient setup. The Genio backoffice plays a crucial role in providing support and guidance throughout both stages, enabling users to navigate the installation process with confidence and ease.
You can get Extract both zips files to the respective folder from fileserver:
- Go to \fileserver\ftproot\Genio\GenioDev\Nightlies
- Extract all the files to your local disk:
- NightlyGenioXXXX.zip - Genio backoffice
- NightlyGenioWebXXXX.zip - GenioWeb
The directory tree should be:
..\Genio..\GenioWeb..\Projects
The folder where new projects will be created, and to where the service will internally generate the applications. This folder must be accessible by both the Generation Services and the WebAdmin.
The user for generation services must have full control, and the WebAdmin user must at least have read access.
Example folder C:\Quidgest\Projects
Installing Genio backoffice
- Search for a Genio backoffice previous version in your local disk and copy:
- GenLicence.lic -- If you dont have any previous Genio backoffice, go to \\fileserver\ftproot\Genio\Licenciamento and copy the GenLicence.lic
- GenGenio.ini -- If you dont have any previous Genio backoffice, you should create a new "Text document" and write the following parameters:
[INIT]
DBMS    = SQLSERVER
SERVER  = XXXXXXX

[GENIO]
PATH    = The path of Genio backoffice (E.g. `C:\Quidgest\Genio`)
PROJECTS = The path to store all projects (E.g. `C:\Quidgest\Projects`)- Paste both into the GEN folder of the new Genio backoffice Nightly
- Open the GenGenio.ini of the Nightly
- Change the PATH for the correct one.
Creating a new project in Genio Backoffice
In Genio backoffice directory e.g.C:\Quidgest\Genio\GEN, you can find the executable Gengenio.exe.
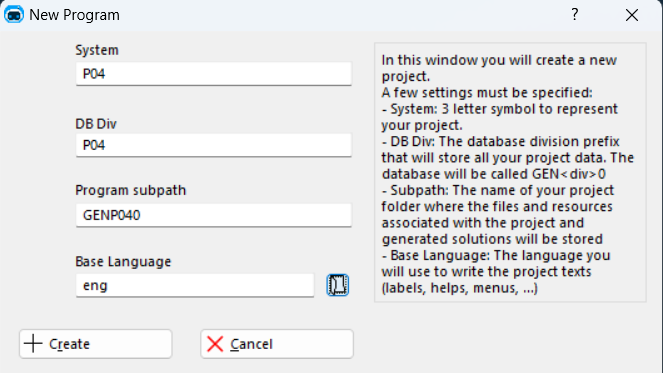
After open Genio, add a new project.
NOTE: please, ensure the "Program subpath" required, has the follow criteria GEN[System]0- System is the name of you System. See the example below:
Installing GenioWeb
To proceed with this step, it is important to have knowledge of how to publish an application on Internet Information Services (IIS). To assist you in this process, we provide a general guide on XXXXXX web aplication guide. Please follow the instructions in our guide, which can be accessed at the following link: install a Web Application.
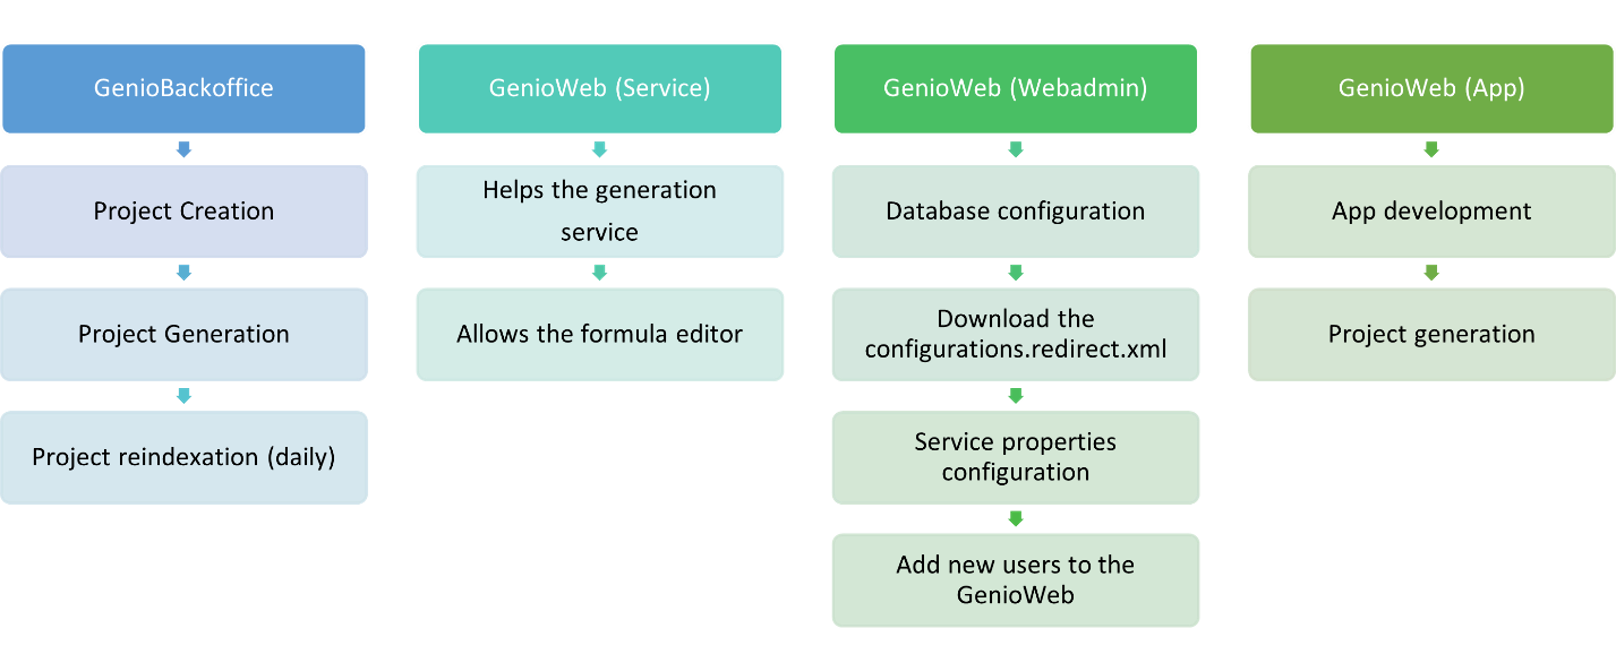
- Install the Generation Service from the Service folder
- Install the WebAdmin website from the Admin folder
- Install the GenioWeb app website from the App folder
- Install the GenioFolder next to the directory where you installed the service.
1. Install Genio Services
Generation services are a bundle of REST Api methods used to generate an application. The service must be published as a Website and fully accessible to both the Application and the WebAdmin instance.
Follow the documentation on Website deployment on IIS7.
NOTE: Don't forget to ensure that the necessary dependencies are updated, namely the .Net Core and Hosting bundle.
For versions beyond 338.14, it is recommended to utilize .NET 8
Example url after publishing: http://localhost/GenioWebService/
Example folder where services are installed: C:\Quidgest\GenioWeb\services
You can also prepare the service files according to the generation service needs:
- Go to the service directory of your GenioWeb installation e.g.
C:\Quidgest\GenioWeb\services - Locate the file named
appsettings.jsonwithin the service directory; - Open the
appsettings.jsonfile using a text editor of your choice. - Look for the default settings related to the projects folder path. You can modify this setting to match the configured path for your projects folder. NOTE: Make sure to follow the specified format and use the appropriate directory path.
- Additionally, follow the instructions provided in the documentation , to add the virtual directory to the
appsettings.jsonfile. This ensures proper deployment and access to your application.
Example below:
{
    "Logging": {
        "LogLevel": {
            "Default": "Warning"
        }
    },
    "AllowedHosts": "*",
    "GenioConfig": {
        "GenioPath": "..\\GenioFolder",
        "ProjectsFolder": "C:\\Quidgest\\GenioWeb\\Projects",
        "DbUser": *******,
        "DbPassword": *******
    },
    "VirtualDirectory": "\thttp://localhost/GenioWebService/"
}
2. Install WebAdmin
In GenioWeb, WebAdmin is responsible for creating new projects, calling generation services and ensuring version upgrading, so take that into account when designing your infrastructure.
Example url after publishing: http://localhost/GenioWebAdmin/
Example folder where the application is installed: C:\Quidgest\GenioWeb\WebAdmin
- On the browser, open the webadmin web application;
- In
System Configurationmenu: DatabaseTab:- Change the server name written, to refer your local server
- Refer the database in us. NOTE: Use the Genio definitions database name:
GEN[System]0 - Insert the correct credentials;
- Provide the name of the shared database:
GEN[System]0 - Save all configurations
ApplicationTab:- Download the `Configuracoes.redirect.xml
- Paste it into GenioWeb app folder: e.g:
C:\Quidgest\GenioWeb\app
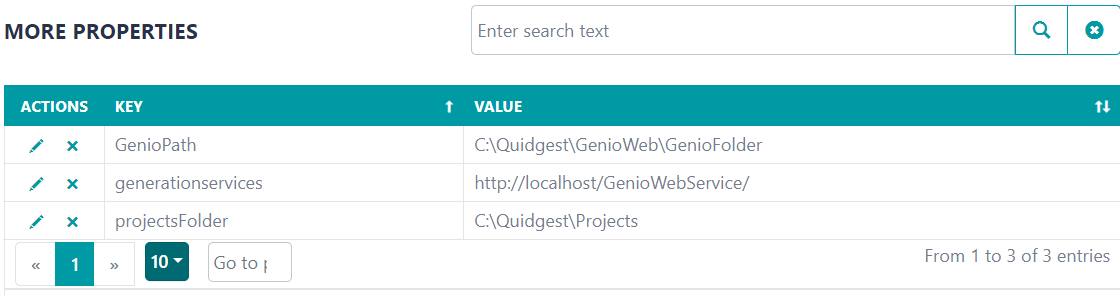
MoreTab: Add three new properties inMORE PROPERTIESsection: GenioPath: The absolute path for where the GenioFolder is installed
generationservices: The url to where the Services webservice is published
projectsFolder: Absolute path for project folder configured above
| Key | Value |
|---|---|
| Genio Path | C:\Quidgest\GenioWeb\GenioFolder |
| generationservices | http://localhost/GenioWebService/ |
| projectsFolder | C:\Quidgest\Projects |
3. Install Application
Publish the application like a normal Vue.js application. Don't forget to place the configuracoes.redirect.xml with the correct path to WebAdmin configuration file
Example url after publishing: http://localhost/GenioWeb/
Example folder where the application is installed: C:\GenioWeb\app
4. Install Genio Folder
The GenioFolder has the templates and all the metadata necessary for Genio to generate a version. This folder must be accessible to both the Application IIS user and the Generation Service.
It's recommended that the folder is placed in the same directory as the services.
If you don't want to install the GenioFolder next to the service directory, make sure that you configure the correct path in
app.configfile in the service folder. Go to the root of the service installation, find the appsetting.json file and change the GenioPath property to the absolute path of where you installed the Genio Services
Example folder: C:\GenioWeb\GenioFolder
NOTE: In this initial phase, the Genio Folder came with the GenioWebNightly. You don't need to worry about.
Setting up the generation service
During the initial phase of your project, it is important to configure a scheduler to ensure the generation process runs automatically and efficiently. You have two options for setting this up:
- Quidserver
A Windows service designed specifically for scheduling periodic tasks. It also acts as a message broker for message queueing. - Webadmin Scheduler (recommended)
A built-in option within the Webadmin interface that offers a more straightforward and integrated way to manage scheduled tasks.
Quidserver scheduler
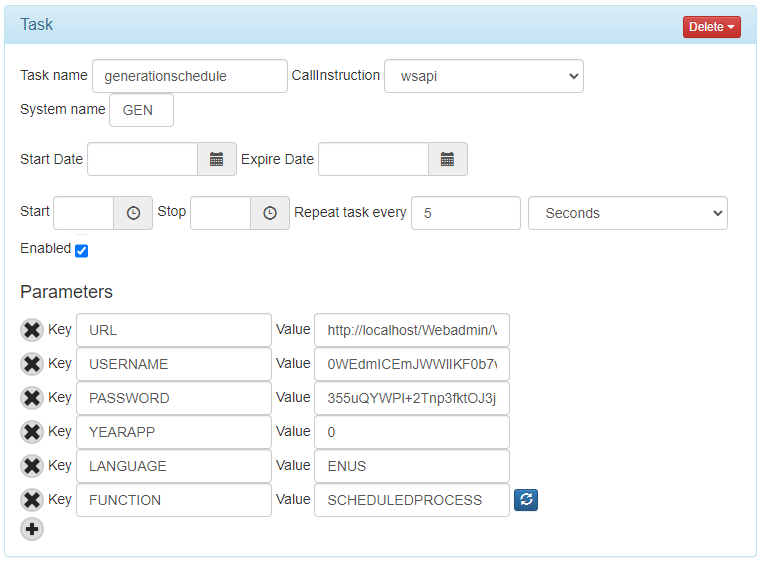
The QuidServer plays a crucial role in automating the generation process by enabling you to schedule the execution of tasks at predefined intervals. It eliminates the need for manual intervention, allowing you to focus on other critical aspects of your project. By configuring the QuidServer, you can define the frequency and timing of code generation, ensuring it occurs consistently and according to your project requirements.
NOTE: The suggested frequency is 5 seconds.
- During the configuration of a scheduled task, the URL (first parameter) refers to the WebApi of WebAdmin, such as
http://localhost/GenioWebAdmin/WebApi.asmx.
NOTE: This URL is crucial as it determines the endpoint where the scheduled task will be executed and processed.
Your task should be presented with the following appearance, as illustrated in the figure below:
WebAdmin scheduler
You can schedule recurring tasks using the scheduler built into Webadmin service. Scheduled tasks timing is specified using the Cron format extended to seconds. This is a standard format, written as a single string, that is very compact and summarizes the set of times a event should trigger.
Read more here
-
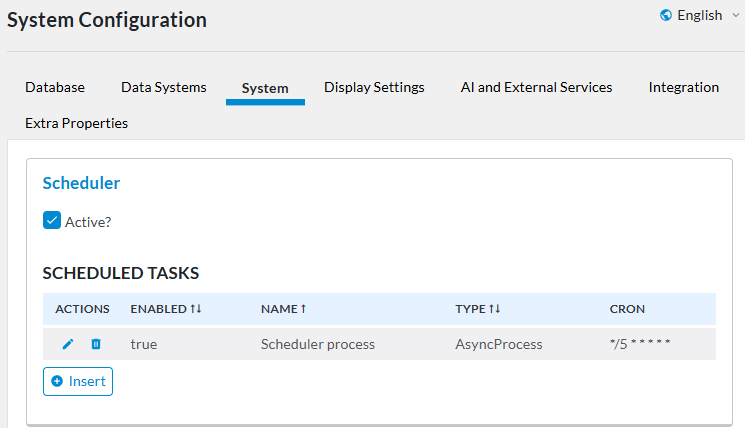
Open the Webamin application and go to the System Configuration menu, then click on the System tab.
-
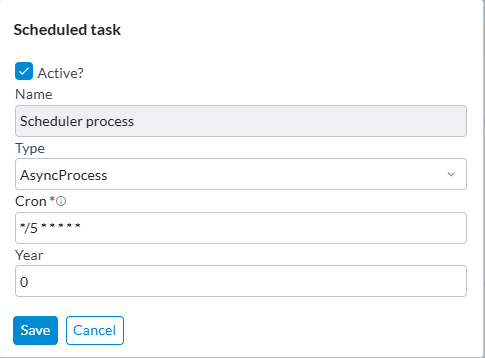
Add a new Scheduled Task with the following settings:
- Name: Enter a descriptive name of your choice.
- Type: Select
AsyncProcessto run asynchronous processes. - Cron: Provide a valid cron expression for the desired schedule.
*/5 * * * * *starts execution every 5 seconds - Year: Set to
0to use the current data system. - ✅ Ensure the Active checkbox is selected.