Scheduler
You can schedule recurring tasks using the scheduler built into Webadmin service. Scheduled tasks timing is specified using the Cron format extended to seconds. This is a standard format, written as a single string, that is very compact and summarizes the set of times a event should trigger. A brief summary of the format is:
                                      Allowed values    Allowed special characters   Comment

+------------- second (optional)       0-59              * , - /
| +------------- minute                0-59              * , - /
| | +------------- hour                0-23              * , - /
| | | +------------- day of month      1-31              * , - / L W ?
| | | | +------------- month           1-12 or JAN-DEC   * , - /
| | | | | +------------- day of week   0-6  or SUN-SAT   * , - / # L ?                Both 0 and 7 means SUN
| | | | | |
* * * * * *
For more details look up the format on the internet. Some supported formats are Chronos library specific so you might want to read up of those as well.
Note: This service deprecates the previous implementation of the task scheduler based on QuidServer. Although nothing prevents them from being used side by side, it is highly recomended to fully migrate the old tasks to this new scheduler so you reduce system complexity.
Configuration
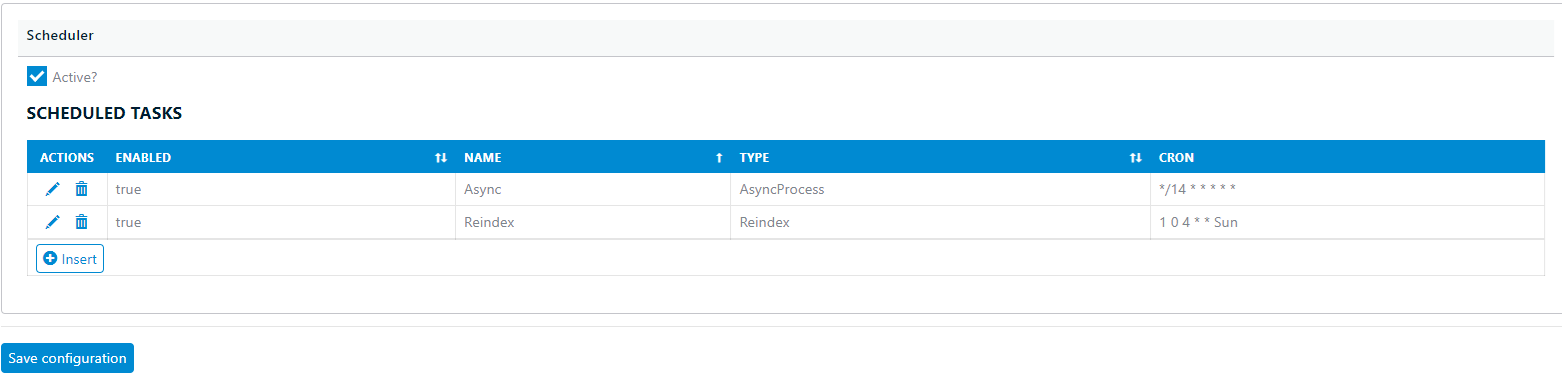
The scheduler service can be enabled in WebAdmin in the system configuration section, in the scheduler tab.
You can then add jobs to run in the scheduler. Each job associated a task processor with a cron schedule and a set of key-value options. Options allow for the same processor to be reused and scheduled independently.
There are some general framework processors available out-of-the-box for things like reindexing the database, notification and consuming the async process queue.
Definition
The only thing a schedule task defines is its identifier, so the definition for your custom tasks is fully defined by the manual routine tag. The list of tasks defined will show up in the webadmin configuration as a Task Type dropdown.
To define the body of a scheduled task use the tag SCHEDULER_TASK with platform ADMCS. To add options to this task declare them with the SCHEDULER_OPTIONS tag.
To define the entire class of a scheduled task use the tag SCHEDULER_CLASS with platform ADMCS. Make sure the class implements interface IScheduledTask.
Tasks are completely agnostic to the database, so its up to the implementation to allocate the persistent support or start transaction as needed, as well as handling any error or exceptions. For long running tasks it is highly advices to split your process into batches. A cancelation token is provided that your processor can use to gracefully stop the task early. If you choose to ignore it, be aware that system shutdowns have hard timers that will kill an application if it does not gracefully release running threads in reasonable time.
Install
This service requires a continuous active WebAdmin process running. This can be thwarted by IIS instalations that recycle the App Pool or suspend idle web apps. To avoid problems when using the scheduler make sure your process is correctly configured to allways run in your host of choice:
IIS
Ensuring IIS web app is always running can be quite involved since web apps are designed to be passive processes. If you choose to go this route please read up official IIS documentation on how to properly configure IIS. At the bare minumum you should:
- Change 'Start Mode' to 'AllwaysRunning'
- Set 'Idle Timeout(minutes)' to '0'
- Set 'Preload Enabled' to 'true'
- For some of this options to work properly you need to change '.Net CLR version' to 'v4.0' rather than 'No managed code'.
If some of these options are not available, check if the 'Application Initialization Module' is enabled in windows features.
Windows Service
You can choose to install the WebAdmin as a windows service rather than a IIS site. If the http ports are already occupied you will need to reconfigure Kestrel to different port in appsettings.json:
  "Kestrel": {
    "Endpoints": {
      "http": {
        "Url": "http://*:5000"
      },
      "https": {
        "Url": "https://*:5001",
        "Certificate": {
          "AllowInvalid": true,
          "Subject": "Machine.domain.org",
          "Location": "LocalMachine"
        }
      }
    }
  },
The ssl certificate might require some infrastructure sysadmin assistance to determine the correct one to use and/or install in the certificate store.
You might want to stick with http locally and setup the https channel in your reverse proxy.
Azure
In web app 'Configuration' section enable the 'Always on' option. Azure will take care of keeping the process running.
Linux
In linux you should install as a systemd service. This tipically involves creating a service extension file in the /etc/systemd/system directory:
[Unit]
Description=Long running service/daemon for SYS Webadmin

[Service]
# will set the Current Working Directory (CWD). Worker service will have issues without this setting
WorkingDirectory=/srv/SYS/Webadmin
# systemd will run this executable to start the service
# if /usr/bin/dotnet doesn't work, use `which dotnet` to find correct dotnet executable path
ExecStart=/usr/bin/dotnet /srv/SYS/Webadmin/Administration.dll
# to query logs using journalctl, set a logical name here
SyslogIdentifier=SYSWebadmin

# Use your username to keep things simple.
# If you pick a different user, make sure dotnet and all permissions are set correctly to run the app
# To update permissions, use 'chown yourusername -R /srv/SYS/Webadmin' to take ownership of the folder and files,
#       Use 'chmod +x /srv/SYS/Webadmin/Administration' to allow execution of the executable file
User=yourusername

# ensure the service restarts after crashing
Restart=always
# amount of time to wait before restarting the service
RestartSec=5

# This environment variable is necessary when dotnet isn't loaded for the specified user.
# To figure out this value, run 'env | grep DOTNET_ROOT' when dotnet has been loaded into your shell.
Environment=DOTNET_ROOT=/usr/lib64/dotnet

[Install]
WantedBy=multi-user.target
Note: Linux support is experimental