Rest-api-security
REST Services Authentication Guidelines
REST services allow clients to access server resources by exchanging representational data state using predefined HTTP methods. REST provides several advantages over other web service frameworks including scalability, simplicity, and flexibility.
However, with the increasing use of REST services, comes the need for secure authentication. Since RESTful applications are stateless, they do not have the benefit of session management that traditional web applications have. This creates challenges for implementing secure authentication mechanisms. Any authentication mechanism implemented for REST services must be able to identify the user and maintain their identity across multiple requests.
In this documentation, we will explore various methods for securing REST services authentication. We will discuss the advantages and disadvantages of each method, as well as provide guidance for choosing the appropriate authentication mechanism for your application needs. The documentation will also cover best practices for implementing secure authentication in a RESTful environment, including the use of SSL/TLS encryption and token-based authentication mechanisms. By following the guidelines outlined in this documentation, you can ensure that your RESTful applications are secure and able to provide seamless and reliable service to clients.
JWT Based Authentication
REST services use JSON Web Tokens to enable flexible integration scenarios. Authentication methods produce these tokens that represent that the user is recognized by the service as valid and is allowed to perform operations on it for a set period of time.
This information is secured by cryptographic means by digitally signing the JWT token with a private key, making it impossible to tamper with the contents of the JWT and ensuring that it was produced exclusively by the REST service.
This token is used in HTTP Authentication headers of subsequent operation calls, propagating trust to whoever owns the token. Since ownership is sensitive the token provides three main mechanisms to work with:
- Expiry date - The expiry date allows the token to be valid only for a specified time, reducing the risk of an attacker gaining access to the service using a stolen token long after it was obtained.
- Refresh - When using a refresh token, the JWT is obtained once, and then the refresh token is used to generate new JWTs without requiring the user to re-enter their credentials. This allows the user to access the service for an extended period of time without the need for constant re-authentication.
- Leasing - Refresh tokens can be marked for leasing. Tokens marked as lease cannot be used to create more refresh tokens. This allows these tokens to be generated for very short lived single use operations of third party services, for example a browser UI.
While the service will set a maximum expiration timespan for the tokens, the service users should request as short timeout as its viable for their operations to be carried out.
REST services do not allow for token revocation mechanisms, since they would require state by definition. Using short timeouts or lease token refreshing mechanisms is the best way to secure and mitigate against replay attacks while maintaining top performance and scalability for the service.
Additionally, JWT tokens contain more information that is used to further secure their access scope:
- Issuer - Setting a unique issuer prevents a token to be reused in the same service published at a different location. For example, a development environment token being wrongfully used in the production environment.
- Audience - Each service carries a unique audience. This prevents tokens for other services from the same Issuer to be reused in this service.
General recommendations
- Deploy the REST service on HTTPS and redirect HTTP traffic - Without HTTPS, sensitive data such as authentication tokens and user credentials can be intercepted by attackers, potentially leading to identity theft and other security breaches. By redirecting HTTP traffic to HTTPS, it ensures that all connections are encrypted, even if the client attempts to connect using an unsecured connection.
- Configure a unique issuer id for the service - This ensures that JWT tokens are unique to the REST service and cannot be used by other services or applications. The issuer id is used to identify the entity that issued the JWT token, making it difficult for attackers to fake or copy tokens issued by other services.
- Configure a maximum token timeout - This ensures that JWT tokens have a limited lifespan, reducing the risk of an attacker gaining access to the service using a stolen token long after it was obtained. By setting a maximum timeout, it allows the token to be valid only for a specified period, after which a new token is required to continue accessing the service.
- Set a random private key and change it regularly - This ensures that the JWT tokens are cryptographically secure and cannot be easily tampered with. By using a strong, randomly generated private key and changing it regularly, it ensures that any breaches or attacks are limited to a small window of time rather than the entire lifespan of the service.
- Create a user to represent each application that connects to the server - By creating separate users for each application connecting to the server, it allows for fine-grained control over access and auditing, ensuring that each application only has access to the resources it needs and any suspicious activity can be easily traced back to the responsible party.
Batch integration Scenarios

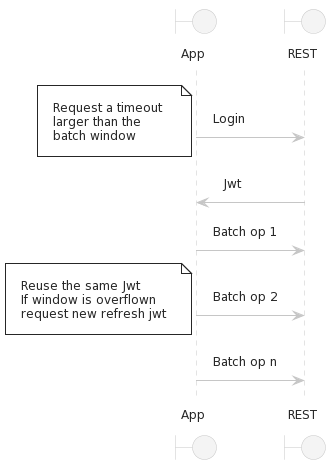
Use of REST services often occurs during preset integration windows, where some information is being processed as a batch and sent to the REST service. Moreover, both the client application and the service are usually in the same secure network that is not exposed to the internet or human user access.
In this scenario a token can be requested once for the expected duration of the integration window. To reduce the integration complexity, it's also viable to use more predictable batches and request a token for each one of them.
If the batches are processed in parallel by multiple hosts its recommended that each one requests its own token and that no communication or information sharing transmits the token.
Realtime integration Scenarios

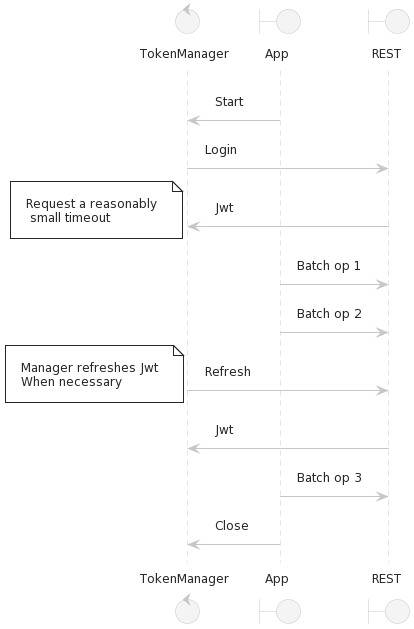
Another scenario is where client applications need to integrate with REST services in real time. In this scenario the operations are expected to be much shorter in duration but a lot more frequent during the day.
The recommended approach here involves requesting a relatively short duration token using full authentication, then using that token to request more refresh tokens when the previous one is about to expire.
Using some token managing class is recommended to avoid having the performance hit of having to request a refresh token per operation.
User facing Scenarios

User facing applications are the most security critical points of an infrastructure. Trust should be limited as much as possible and information restricted to the bare minimum necessary for the user operation.
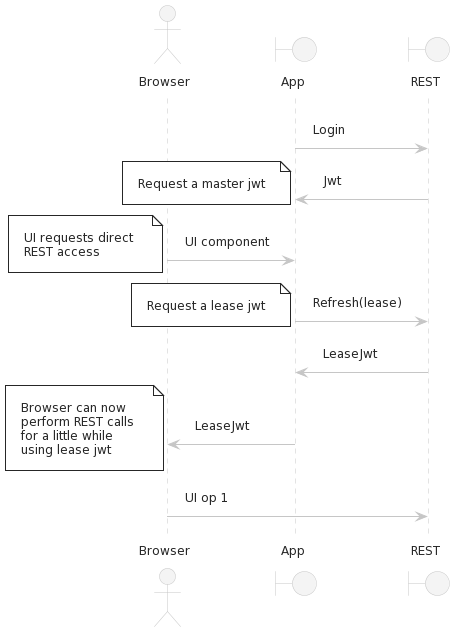
We recommend that in this scenario that the front end part of the application never performs the authentication to the REST service itself. Instead, only the backend should perform the full authentication since it requires the knowledge of a password secret.
Lease tokens should then be requested as needed by the User facing interface, and only if this interface requires direct interaction with the REST service. Ideally, instead of this a backend proxy should be devised to handle operations, but there are situations like in PWA's style apps where this may not be possible. Lease tokens exist for the sole purpose of handling this scenario.
Token manager sample code
The following client side code is an example in c# of how refresh tokens can be chained together to keep the service authentication valid. The advantage of switching to refresh tokens when possible is that the username and password do not need to be sent over the wire, reducing security exposure.
This code is provided as just an example. You should modify it to fit your programing language, namespaces and configuration sources.
using System.IdentityModel.Tokens.Jwt;
using System.Net.Http.Headers;
//where your openapi client is
using Rest.Api;

namespace Rest.Utils;

/// <summary>
/// Manages jwt tokens in the background, refreshing the previous one when the old one expires.
/// </summary>
public class JwtTokenManager
{
    public string Token { get; set; }
    private DateTime tokenExpiration;
    private TimeSpan threshold;

    private swaggerClient apiClient;
    private CancellationTokenSource refreshCancelationSource;
    private Task? refreshTask;
    private HttpClient http;

    public JwtTokenManager(swaggerClient apiClient, HttpClient http, TimeSpan threshold)
    {
        this.apiClient = apiClient;
        this.http = http;
        this.refreshCancelationSource = new CancellationTokenSource();
        this.threshold = threshold;
        this.Token = string.Empty;
    }

    public async Task<string> Start(string username, string password)
    {
        //fetch token from full authentication in rest service
        var login = await apiClient.AuthLoginAsync(new LoginRequest()
        {
            Username = username,
            Password = password
        });

        //parse the token to get the expiration date
        parseToken(login.Token);

        //launch a background task to refresh the token when it expires
        refreshTask = Task.Run(tokenRefreshTask, refreshCancelationSource.Token);

        return login.Token;
    }

    public async Task Stop()
    {
        //Can only stop a task that has been started
        if(refreshTask is null) return;

        //stop the background task
        refreshCancelationSource.Cancel();

        //wait for the task to end
        await refreshTask;
        refreshTask = null;

        refreshCancelationSource.Dispose();
        refreshCancelationSource = new CancellationTokenSource();
    }

    private void parseToken(string newToken)
    {
        //extract expiration date from token
        var handler  = new JwtSecurityTokenHandler();
        var parsedToken = handler.ReadJwtToken(newToken);
        tokenExpiration = parsedToken.ValidTo;

        Token = newToken;

        //set the authentication header on the http client
        http.DefaultRequestHeaders.Authorization = new AuthenticationHeaderValue("Bearer", newToken);
    }

    private async Task tokenRefreshTask()
    {
        //loop until we signal the process to stop
        while (!refreshCancelationSource.Token.IsCancellationRequested)
        {
            //sleep until the token expires
            var refreshTime = tokenExpiration - DateTime.Now - threshold;
            if(refreshTime > TimeSpan.Zero)
                await Task.Delay(refreshTime , refreshCancelationSource.Token);

            //fetch new token
            var login = await apiClient.AuthRefreshAsync(null, null);

            //parse the token to get the expiration date
            parseToken(login.Token);
        }
    }
}
HTTPS Redirection Configuration
In the system, the https_redirect option controls how the application handles HTTPS (Hypertext Transfer Protocol Secure) requests. Ensuring secure communication via HTTPS is critical to protect sensitive information as it travels between your users and the server.
There are three modes available for configuring HTTPS redirection. These modes determine how the application responds when users access the website via HTTP (unsecured) or HTTPS (secured) protocols.
Configuration Options:
1. none
- Description: No action is taken. The application will serve both HTTP and HTTPS requests without enforcing secure communication.
- When to Use:
- This mode can be used in non-production environments (such as local development) or when HTTPS is managed externally by a reverse proxy or load balancer.
- Security Impact: No security is enforced at the application level, which may expose sensitive data if users access the site over an unsecured HTTP connection.
2. hsts
- Description: Enforces HTTP Strict Transport Security (HSTS). This instructs browsers to only connect to the application using HTTPS, even if the user attempts to access via HTTP. The browser automatically redirects HTTP requests to HTTPS in future visits.
- When to Use:
- Use this in production environments to ensure that users are always connecting via HTTPS.
- This option is ideal if you want to avoid any accidental HTTP connections after the first HTTPS request.
- Security Impact: Provides the highest level of security by preventing users from downgrading to HTTP once they’ve accessed the site over HTTPS. Even if they type
http://, their browser will automatically switch tohttps://. - Note: Only use HSTS if your site already has a valid SSL certificate and is fully accessible via HTTPS.
3. redirect (default)
- Description: Automatically redirects all HTTP traffic to HTTPS. When a user accesses the site via HTTP, they will be redirected to the HTTPS version of the same URL.
- When to Use:
- This is the default setting and should be used in production environments where you want to ensure all traffic is redirected to HTTPS.
- Security Impact: Ensures that users always connect over a secure HTTPS connection. However, it does not provide the additional browser-level security that HSTS offers.
- User Experience: The user is redirected seamlessly to the secure version of the site.
How to Set the Option:
You can configure the https_redirect option in your application’s appsettings.json settings. Depending on the infrastructure of your application, this might be done in a configuration file, an environment variable, or an admin panel.
Example Configuration:
{
    "https_redirect": "hsts"
}
WCF
The signature for the method generated by this list:
    [OperationContract]
        [WebInvoke(BodyStyle = WebMessageBodyStyle.WrappedRequest,
          RequestFormat = WebMessageFormat.Json,
          ResponseFormat = WebMessageFormat.Json,
          UriTemplate = "DBEditSelectSeveralEntities")]
        DBEditResponseSeveralEntities DBEditSelectSeveralEntities(Authentication authentication, LogicalCondition condition, Paging paging, Order order);
The the signature for method generated for the update operation:
        [OperationContract]
        [WebInvoke(BodyStyle = WebMessageBodyStyle.WrappedRequest,
          RequestFormat = WebMessageFormat.Json,
          ResponseFormat = WebMessageFormat.Json,
          UriTemplate = "FormUpdateCompany")]
        Response FormUpdateCompany(Authentication authentication, FormRecordCompany record);